In this article we walk through the different APIs for pinning and unpinning a UWP app to different destinations, and show how to bundle these calls into a single AppTile class that provides a ‘pinning service’ including:
- pinning to the taskbar,
- pinning to the start menu, and
- enumerating, pinning and unpinning secondary tiles.
public class AppTile
{
    // ...
}
We also describe the impact of pinned tiles to the application launch process and how to debug your app in this scenario.
This article comes with a sample app on GitHub that looks like this:
The AppTile class or service makes it easier to use the down-to-earth API’s in UWP apps that use MVVM and data binding. Here’re the class diagram. I’m assuming that its member names are sufficiently self-explanatory:
Pinning to the taskbar
Users can manually pin your app to the taskbar, but you can also friendly hint this from your app and then pin programmatically. All the details for this are nicely explained in the official documentation, so allow me to stay brief on the details.
Service API
Not every device that runs your app comes with a recent OS and/or a taskbar. Before calling pinning features, you have to ensure that there is a Windows TaskBarManager (via ApiInformation.IsTypePresent) and that the taskbar itself is present and accessible (through IsPinningAllowed):
public static bool IsPinToTaskBarEnabled
	=> ApiInformation.IsTypePresent("Windows.UI.Shell.TaskbarManager")
	   && TaskbarManager.GetDefault().IsPinningAllowed;
When you programmatically pin your app to the taskbar, a dialog will pop up to ask for the user’s consent. To avoid an embarrassing experience, it makes sense to first discover whether the app is already pinned. This is done with a call to IsCurrentAppPinnedAsync():
public async static Task<bool?> IsPinnedToTaskBar()
{
    if (IsPinToTaskBarEnabled)
    {
        return await TaskbarManager.GetDefault().IsCurrentAppPinnedAsync();
    }
    else
    {
        return null;
    }
}
Eventually a call to RequestPinCurrentAppAsync() will launch the pinning process:
public static async Task<bool?> RequestPinToTaskBar()
{
    if (IsPinToTaskBarEnabled)
    {
        return await TaskbarManager.GetDefault().RequestPinCurrentAppAsync();
    }
    else
    {
        return null;
    }
}
Usage
The AppTile API is designed for easy use in any UWP app, but maybe the IsPinnedToTaskBar() method will pose a challenge. I can imagine that you may want to access this asynchronous member as a property or from inside a synchronous method (e.g. in data binding). I did not code a synchronous version inside the AppTile class, since it feels like an anti-pattern. There are more than enough asynchronous methods in a page or control’s life cycle, so you should use these to do calls that are asynchronous by nature.
Nevertheless, with Task.Run<T> you could easily create a synchronous wrapper that executes on the UI thread (a requirement for the call). Here’s the corresponding code snippet from the main page of the sample app:
var isPinned = Task.Run<bool?>(() => AppTile.IsPinnedToTaskBar()).Result;
Using this wrapper, the hosting UI element can define bindable properties and commands:
private bool PinToTaskBar_CanExecute()
{
    var isPinned = Task.Run<bool?>(() => AppTile.IsPinnedToTaskBar()).Result;
    return !isPinned ?? false;
}

private async void PinToTaskBar_Executed()
{
    await AppTile.RequestPinToTaskBar();
}
Here are the XAML snippets for status field and command button:
<TextBlock Text="{x:Bind IsPinnedToTaskBar()}" />

<AppBarButton Icon="Pin"
              Label="Pin to Task Bar"
              IsCompact="False"
              Command="{x:Bind PinToTaskBarCommand }" />
Here’s how the system dialog to get the user’s consent looks like:
A couple of years ago, Windows 8.* came with different icons for ‘Pin to Start’ and ‘Pin to Taskbar’ using pins that pointed in the appropriate direction:
Windows 10 uses the same horizontal pin icon for both, and a diagonal one for unpinning. Inside your own app you may choose other icons of course. The Symbol Enum has a Pin and an UnPin icon.
Pinning to the start menu
It should not come as a surprise that the Start Menu Pinning API is similar to the Taskbar Pinning API. All documentation is here. Again, we made a wrapper to detect whether the service is enabled. It uses ApiInformation.IsTypePresent, and checks whether your app is allowed through SupportsAppListentry in the Windows StartScreenManager. To verify if your app is allowed you need to look up its main tile as an AppListEntry from GetAppListEntriesAsync:
public static bool IsPinToStartMenuEnabled
{
    get
    {
        if (ApiInformation.IsTypePresent("Windows.UI.StartScreen.StartScreenManager"))
        {
            return Task.Run<bool>(() => IsPinToStartMenuSupported()).Result;
        }

        return false;
    }
}

private static async Task<bool> IsPinToStartMenuSupported()
{
    AppListEntry entry = (await Package.Current.GetAppListEntriesAsync())[0];
    return StartScreenManager.GetDefault().SupportsAppListEntry(entry);
}
To detect whether you main tile is already pinned to the start menu, you have to look up the app list entry again from your Package [note to self: there’s room for a helper method in the AppTile class] and then ask it to the StartScreenManager with ContainsAppListEntryAsync:
public static async Task<bool?> IsPinnedToStartMenu()
{
    if (IsPinToStartMenuEnabled)
    {
        AppListEntry entry = (await Package.Current.GetAppListEntriesAsync())[0];
        return await StartScreenManager.GetDefault().ContainsAppListEntryAsync(entry);
    }
    else
    {
        return null;
    }
}
The request to programmatically pin is done through RequestAddAppListEntryAsync():
public static async Task<bool?> RequestPinToStartMenu()
{
    if (IsPinToStartMenuEnabled)
    {
        AppListEntry entry = (await Package.Current.GetAppListEntriesAsync())[0];
        return await StartScreenManager.GetDefault().RequestAddAppListEntryAsync(entry);
    }
    else
    {
        return null;
    }
}
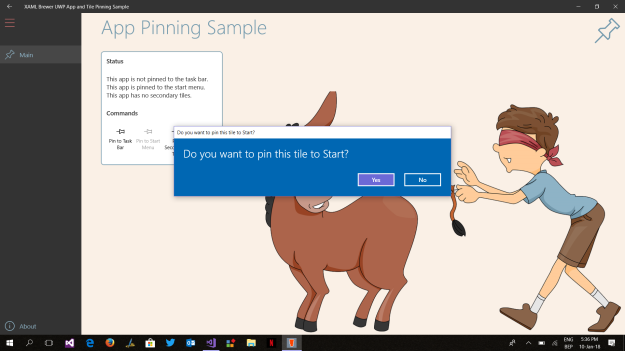
Here’s the corresponding system dialog:
Observe the complete difference in style with the taskbar system dialog…
A word (or four) about unpinning
By default, all developer’s pinned tiles are automatically unpinned when you compile the app after a source code change. I didn’t find a switch to alter this behavior.
Programmatically unpinning from start menu or taskbar is not included in the official API’s.
Secondary tiles
A secondary tile allows your users not only to startup the app, but also to directly navigate to a specific page or specific content. All the official info is right here.
Pinning secondary tiles
When you pin a secondary tile, the app (or the user) needs to give it a name. The name of the secondary tile serves as an identifier for the specific page or content that it is deep-linked to. In most cases you can grab this from the current context, the sample app just asks the user for it:
There are some restrictions in the string identifier for a secondary tile: there’s a maximum length of 2048 (that’’s still long enough to hold a simple serialized object) and it doesn’t like some characters, like spaces or exclamation marks. The AppTile service comes with a method to clean this up:
private static string SanitizedTileName(string tileName)
{
    // TODO: complete if necessary...
    return tileName.Replace(" ", "_").Replace("!","");
}
The API for pinning secondary tiles is available in all Windows 10 versions and is enabled on all devices, so there’s no call required to check if it’s enabled. Before pinning a secondary tile, you should verify whether it exists already with SecondaryTile.Exists, and then you call one of the constructors of SecondaryTile. If you want the tile name to be displayed with ShowNameOnSquare150x150Logo (which is a horrible property name), then you have to make sure to provide a tile image that comes with free space at the bottom. Fortunately the SecondaryTile class can deal with this – you can even use a different image for each secondary tile. Actually there is a lot more that you can do with secondary tiles, but I’m just focusing on the pinning part here. With RequestCreateAsync the tile is created:
public async static Task<bool> RequestPinSecondaryTile(string tileName)
{
    if (!SecondaryTile.Exists(tileName))
    {
        SecondaryTile tile = new SecondaryTile(
            SanitizedTileName(tileName),
            tileName,
            tileName,
            new Uri("ms-appx:///Assets/Square150x150SecondaryLogo.png"),
            TileSize.Default);
        tile.VisualElements.ShowNameOnSquare150x150Logo = true;
        return await tile.RequestCreateAsync();
    }

    return true; // Tile existed already.
}
Here’s the corresponding system dialog to get the user’s consent:
Here’s a screenshot from a start screen with the main tile and some secondary tiles from the sample app:
This is the code from the main page, it uses the Dialog Service:
private async void PinSecondaryTile_Executed()
{
    var tileName = await ModalView.InputStringDialogAsync("Pin a new tile.", "Please enter a name for the new secondary tile.", "Go ahead.", "Oops, I changed my mind.");
    if (!string.IsNullOrEmpty(tileName))
    {
        await AppTile.RequestPinSecondaryTile(tileName);
    }
}
Enumerating secondary tiles
The FindAllAsync static method on SecondaryTile returns all secondary tile instances for your app, so you could use it to detect if there are any:
public async static Task<bool> HasSecondaryTiles()
{
    var tiles = await SecondaryTile.FindAllAsync();
    return tiles.Count > 0;
}
or to enumerate their identities:
public async static Task<List<string>> SecondaryTilesIds()
{
    var tiles = await SecondaryTile.FindAllAsync();
    var result = new List<string>();
    foreach (var tile in tiles)
    {
        if (!string.IsNullOrEmpty(tile.TileId))
        {
            result.Add(tile.TileId);
        }
    }

    return result;
}
Here’s the sample app displaying the list of secondary tiles:
Unpinning secondary tiles
With RequestDeleteAsync you can unpin a secondary tile. You have to provide its identity:
public async static Task<bool> RequestUnPinSecondaryTile(string tileName)
{
    if (SecondaryTile.Exists(tileName))
    {
        return await new SecondaryTile(tileName).RequestDeleteAsync();
    }

    return true; // Tile did not exist.
}
Unpinning does not require the user’s consent, so there’s no dialog involved.
Launching the App from a pinned tile
When the user clicks a pinned tile, your app is launched. If the launch came from a secondary tile, then its identity is reflected in the startup arguments.
UWP does not support running multiple instances of the same app. This means that when the user clicks a tile, the OnLaunched of the running instance of the app may be called. You have to prepare for that – I had to change my ActivationService for this:
- When the app was already running (ApplicationExecutionState.Running) and there are no startup arguments (main tile or taskbar) then we may simply ignore the call.
- If there are startup arguments then the launch was done through a secondary tile. In that case, we navigate to the tile-specific content. In the sample app, this means navigating to the Home page.
Here’s the code for this scenario:
public async Task LaunchAsync(LaunchActivatedEventArgs e)
{
    if (e.PreviousExecutionState == ApplicationExecutionState.Running)
    {
        if (string.IsNullOrEmpty(e.Arguments))
        {
            // Launch from main tile, when app was already running.
            return;
        }

        // Launch from secondary tile, when app was already running.
        Navigation.Navigate(typeof(HomePage), e.Arguments);
        return;
    }

    // Default Launch.
    await DefaultLaunchAsync(e);
}
When the app was not running during the launch, we do the standard initializations, and afterwards navigate to the tile-specific content if necessary. Notice that the Navigation Service passes the startup arguments to the target page:
private async Task DefaultLaunchAsync(LaunchActivatedEventArgs e)
{
    // Custom pre-launch service calls.
    await PreLaunchAsync(e);

    // Navigate to shell.
    Window.Current.EnsureRootFrame().NavigateIfAppropriate(typeof(Shell), e.Arguments).Activate();

    // Custom post-launch service calls.
    await PostLaunchAsync(e);

    // Navigate to details.
    if (!string.IsNullOrEmpty(e.Arguments))
    {
        Navigation.Navigate(typeof(HomePage), e.Arguments);
    }
}
The target page gets the startup arguments in its OnNavigatedTo handler and can act on it. The sample app just stores the tile name in a field:
private string navigationParameter = string.Empty;

public string NavigationParameter => navigationParameter;

protected override void OnNavigatedTo(NavigationEventArgs e)
{
    if ((e != null) && (e.Parameter != null))
    {
        navigationParameter = e.Parameter.ToString();
    }

    base.OnNavigatedTo(e);
}
A text block is bound to the value of that parameter:
<Run Text="{x:Bind NavigationParameter}" />
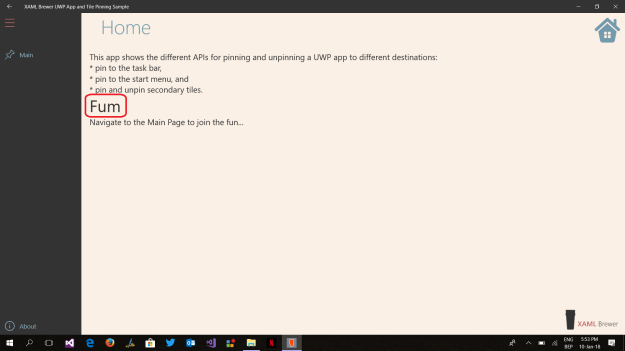
Here’s how this looks like at runtime:
Debugging launch from a tile
To debug an app-launch from a tile, go to Debug/Other Debug/Targets/Debug Installed Package:
Select your app from the list, check the do-not-launch-but-debug-when-it-starts box, and press the start button:
When you click on one the pinned tiles, you’ll see your breakpoints getting hit:
Code
That’s it! The AppTile services and the sample app live here on GitHub.
Enjoy!


