The number of UWP Composition Effects is relatively limited -especially compared to the total list of Win2D effects. But you can roll your own custom effect by building an effect factory that combines two or more effects. In this short article we’ll explain how a XAML UWP app can combine –or chain- multiple Composition Effects on a single image, and update properties on (one of) these effects dynamically.
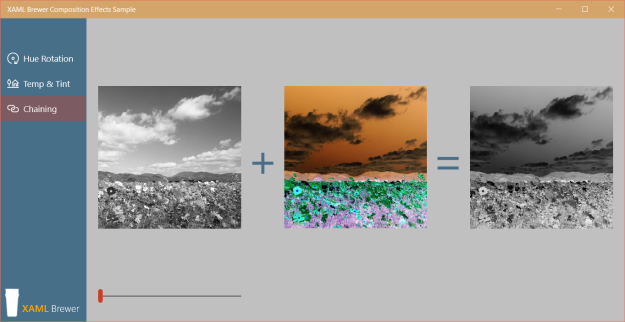
Here are some screenshots of the corresponding sample app.
- The image on the left shows a configurable SaturationEffect. This effect allows you adapt the saturation of the image – how far the colors are from any shade of grey. The saturation can be changed by the slider underneath.
- The middle image shows the result of an InvertEffect that … inverts the colors of the same base image.
- The image on the right combines the two effects:
The steps to load an image, apply any of the Composition Effects on it and display the result inside a XAML element, were explained in previous blog posts. So allow me to fast-forward through the process. The same steps are also explained on MSDN, but the sample app executes them in a totally different order. As long as you build a decent effect graph, it will display properly.
Here’s how the sample app does it:
- Create an instance of SpriteVisual using Compositor.CreateSpriteVisual, and add it to the composition tree by using the Children property of a ContainerVisual:
_leftSpriteVisual = _compositor.CreateSpriteVisual();
var side = (float)Math.Min(LeftPresenter.ActualWidth, LeftPresenter.ActualHeight);
_leftSpriteVisual.Size = new Vector2(side, side);
_leftRoot.Children.InsertAtTop(_leftSpriteVisual);
- Create a surface brush using Compositor.CreateSurfaceBrush, and load an image in it:
// Create CompositionSurfaceBrush
_imageBrush = _compositor.CreateSurfaceBrush();

// Create an image source to load
var imageSource = _imageFactory.CreateImageFromUri(
	new Uri("ms-appx:///Assets/flowers.jpg"));
_imageBrush.Surface = imageSource.Surface;
- Create an effect description. Set any effect sources with either an instance of CompositionEffectSourceParameter (that’s what we do for the first two effects) or another effect (that’s what we do for the combined effect).
- Create a CompositionEffectFactory with Compositor.CreateEffectFactory using the effect description as input. Define the dynamic (configurable and/or animatable) properties.
- Create an instance of the effect using CompositionEffectFactory.CreateBrush.
- Set the Brush property of the SpriteVisual to the created effect.
Here’s the code for the saturation effect, with the saturation value as a dynamic property:
// Create and apply the first effect.
_firstEffect = new SaturationEffect
{
    Name = "firstEffect",
    Source = new CompositionEffectSourceParameter("source")
};
var firstEffectFactory = _compositor.CreateEffectFactory(
	_firstEffect,
	new[] { "firstEffect.Saturation" });
_effectBrush1 = firstEffectFactory.CreateBrush();
_leftSpriteVisual.Brush = _effectBrush1;
Here’s the code for the invert effect, without any configuration:
// Create and apply the second effect.
var secondEffect = new InvertEffect
{
    Name = "secondEffect",
    Source = new CompositionEffectSourceParameter("source")
};
var secondEffectFactory = _compositor.CreateEffectFactory(secondEffect);
_effectBrush2 = secondEffectFactory.CreateBrush();
_middleSpriteVisual.Brush = _effectBrush2;
And finally, here’s the code to create the combined effect. Observe that it is just an InvertEffect that takes the SaturationEffect as Source:
// Create and apply the combined effect.
_combinedEffect = new InvertEffect
{
    Name = "chained",
    Source = _firstEffect
};
var combinedEffectFactory = _compositor.CreateEffectFactory(
	_combinedEffect,
	new[] { "firstEffect.Saturation" });
_combinedBrush = combinedEffectFactory.CreateBrush();
_rightSpriteVisual.Brush = _combinedBrush;
- Set the CompositionEffectSourceParameter values using CompositionEffectBrush.SetSourceParameter using the name of the source parameter as previously specified.
Observe that we reuse the same image brush instance in all three images:
// Chain the brushes
_effectBrush1.SetSourceParameter("source", _imageBrush);
_effectBrush2.SetSourceParameter("source", _imageBrush);
_combinedBrush.SetSourceParameter("source", _imageBrush);
The image that is loaded into the first effect (the source of the combined effect) is tied to the first effect factory, NOT the combined effect factory. So you do have to load the image into the combined brush.
- Update the dynamic properties. These are the properties that you will set on-the-fly, with or without animation. Here’s the code behind the slider:
private void Slider_ValueChanged(object sender, RangeBaseValueChangedEventArgs e)
{
    if (_effectBrush1 != null)
    {
        // Apply parameter to brushes.
        _effectBrush1.Properties.InsertScalar(
	"firstEffect.Saturation",
	(float)e.NewValue);
        _combinedBrush.Properties.InsertScalar(
	"firstEffect.Saturation",
	(float)e.NewValue);
    }
}
Again, the dynamic properties for the first effect brush are tied to the first effect factory, and hence do not apply to the combined effect. So you have to update the dynamic properties on the combined brush. The sample app needs to update two brushes, because it displays the two separate images.
That app lives here on GitHub.
Enjoy!

